|
||||
|
Zion National Park Lodging Park Info Vacation Weather Photos Hike SR-9 Slots Backpack Camping |
||||
|
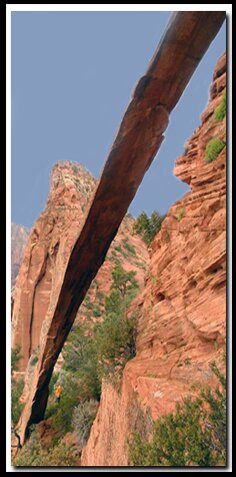
Bridge Mountain: Hepworth Arch and Bridge Mountain Arch This is a path few travel due to the difficulty of the trail, the technical climbing section and the short season it can be hiked. The trail begins at Gifford Canyon and heads up the slickrock into Hepworth Wash. There are two amazing free standing arches along this route including Bridge Mountain Arch at the end of the trail.
 Hazards: The slick rock is dangerous when wet due to the moss that absorbs water and becomes slick. The chimney is a 5th class climbing section with no anchors. There are two sections of exposed cliff side, slickrock crossing. Hazards: The slick rock is dangerous when wet due to the moss that absorbs water and becomes slick. The chimney is a 5th class climbing section with no anchors. There are two sections of exposed cliff side, slickrock crossing. Be aware that slickrock hiking in wet or freezing conditions is dangerous. Camping - A nice camping spot in near the intermittent stream in Hepworth Wash, but this requires hiking back up the steep slickrock with your backpack on the return. The better choice might be to camp in the grassy area at the top of the first steep incline. Water Availability: Usually none.
Gifford Canyon - Park at the east side of the Zion-Mt. Carmel Tunnel then follow the beaten path that runs alongside the bridge and descends into the drainage. Head upstream about 100 yards, looking for signs of use up through the trees on the alcove on the right. Once up top, the 'trail' traverses and then switches back until it drops into Gifford Canyon. If this is as far as you are going, it is a casual 3 mile stroll to the end of the trail and back. Hepworth Arch - Walk .75 miles down Gifford Canyon to where another drainage enters from the right, then head up the slickrock mountain, staying to the right where it's less steep. Ramps and ledges dictate the course to follow as the route zigs and zags upward. When the small cliffs dotted with pine trees come into view above you need to head for the base of those cliffs. There is a small drainage to the right of the cliff base that leads to a ridge, scramble up and to the left onto it as you progress steadily upward. Soon cairns (rock pile markers) lead the way into a massive sandstone bowl just beneath the rim. Go into it, then bear west, picking the easiest route to the plateau above. Once on top, go north, looking for a canyon that runs east-west which you enter by descending north and west avoiding the cliff band below the eastern rim. Drop into the main drainage below, then navigate the down climbs. Look for another wash entering the canyon from the right, walk up it to the 40 foot wall that you will need to pick your way up. Navigating the main drainage is impossible without rappelling so from the top of the ridge walk 100 feet north to the steep ramp that goes down and to the south and then descends into the east-west canyon. Once at the bottom of the canyon travel downstream, looking for a hidden slit, the Vortex, in the canyon wall located at the head of the wash. If temperatures are hot outside the rapidly moving air in the slot will be chilly, making it a great place to cool off. Next, walk down canyon until the path connects with Hepworth Wash. An intermittent stream is often flowing and filled with toads and other delightful creatures. The Hepworth Arch is a little more than half mile down Hepworth Wash, on the right. This is an enjoyable camping area or a destination for a day hike. To continue to Crawford Arch you need 100 feet of rope, rappel device and harness for the 5th class climbing in the chimney. There are also two extremely narrow and exposed areas to be crossed. Crawford Arch - Hike north through Hepworth Wash for about a mile where you come to a drainage entering from the west, proceed into it but you will need to quickly leave it, going up to the right and northwest then making your way through the trees and cacti. After gaining elevation, the "V" notch to the right of Bridge Mountain and a smaller rock outcropping on the right of the notch are the goal. Don't be lured to the larger of the notches farther to the right. Drop into the next wash you encounter and follow it west. Once near the head, look up and to the right to see the steep, bushy ramp which you need to scramble up to the saddle on top, and once again descend an even steeper drainage which is located on the backside of this saddle. At the bottom of the drainage, there is a beaten path on the left side that hugs the rock slab to the left. Soon a steep right sloping rock slab with an exposed drop off is encountered. Sticky rubber soled shoes will be helpful during this short traverse. After you are past it, you will be required to scramble up the buttress ahead before you get to the chimney, which is the technical climbing section requiring 100' of rope to get to the arch. There should be a log wedged about 6 feet up in the chimney that makes it easier to get between the narrow rocks and to move to the ledge that is visible about 35 feet above. Be certain to go up the chimney on the right side of the log. Do not go up the chimney on the left. You could also stay in the chimney and go deep, back through a slot in the rear of it. If there are more than two in your party, its advisable to belay from an anchor of webbing slung from trees on the ledge just above the climb itself. Continue up the steep rock and tree filled ramp system 300 feet to a couple of large ponderosa trees. At this point there is low angle slickrock and a narrow ledge system that needs to be negotiated. Hike up about 15 feet and then bear right, traversing a small ledge and gaining elevation. Don't go too high, because you will need to come back down once you see the hanging valley come into sight. Head for the obvious weakness taking you into this desert oasis of dunes and ponderosa. Walk to the south, toward the bottom of the valley, then steer left around the dry falls, aiming for the steep, tree covered slope. Scramble up the slope and then bear right to Crawford Arch. GPS Coordinates WGS84 Datum
Ascent from bottom of Descend into East-West Canyon Intersection of East-West Canyon Saddle Chimney Crawford Arch Freestanding Arches in Zion National Park Free Standing Arches just outside of Zion National Park Canaan Mountain Pictures GPS coordinates are only references and may or may not be accurate. Do not rely on GPS coordinates as the sole method of navigation. Always have an accurate, detailed map at hand and have the proper map reading and navigation skills before setting out on any hike. Many of the hikes listed in this guide travel into canyons where a GPS has limited capabilities. Always check your position with a detailed map before dropping into a canyon. Beta: Coordinates and other trail and canyoneering information by Zion Park search and rescue veteran team member Bo Beck and zionnational-park.com author Mary Cisneros. To post trip reports, offer corrections, updates, or for more information please visit the Zion National Park Forum Suggested Gear: A sturdy pair of shoes are recommend to hike the trails in Zion National Park. Many quality shoes will help grip the rocks and prevent injury.
Zion National Park, UtahHistory of the Thunderbird |
East Zion Lodge Mileage from Stay in a hotel the heart of the parks, Mount Carmel Junction, and visit the treasures of the Southwest and Utah. Site Map Zion Hiking |
||||||||||||
|
This is my new favorite quote:
"I don't know who Mary Cisneros is, but I mean zionnational-park.com It's a better site than the NPS's anyway." Written by the authors of the book: Favorite Hikes in and around Zion National Park |
|||||||||||||
|
Zion History |
|---|
All rights reserved © Copyright Zion National-Park dot com
Do not use text, photos or maps without permission © Zion National-Park dot com
Contact the Author Mary Cisneros with any errors


 Parking at Tunnel