 |
||||
|
Zion National Park Lodging Park Info Vacation Weather Photos Hike SR-9 Slots Backpack Camping |
||||
Zion: Lady MountainLong ago pioneers named Lady Mountain as well as a wide array of other lofty monoliths nestled in the dramatic beauty of Zion Canyon. While at the Emerald Pools Trailhead, look up and locate the blind arch near the top of the towering white monolith in front of you. You can attempt to find the figure of a woman near the arch, but in our experience it takes quite the imagination to see it. Today's obscure route to the summit of this Zion landmark was once a popular and maintained trail, equipped with chains and other safety devices, much like those found along the popular Angels Landing Trail. Completed in 1924, this amazing route up the steep mountainside was the first trail constructed by the park leading to one of the rims. Imagine adventurous women of the 1920's in their heels and long dresses as they trudged up the route, leaving the roar of Zion's dramatic river carved canyon below, making their way to the lofty destination at the top. At a Glance
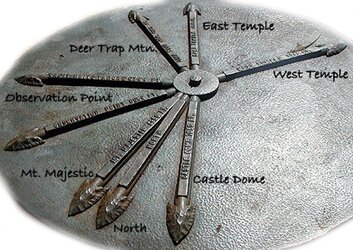
Obstacles - The first obstacle is found just after the initial cliff-band. A right facing corner requires a 30-foot climb, but the moki-steps make it easier. Due to the exposure, a rope belay or hand-line is strongly suggested. A rope will also be needed at the next obstacle - the chimney. This has an over-hanging, 8-foot boulder move, rated at 5.3 YDS. It is found a little less than one-mile into the ascent. Let the best climber in your group take the rope up the unprotected section where they will find a re-bar eyelet anchor. They can then belay less experienced climbers. Keep in mind that the exposure on this move is about 80 feet and the consequences of a slip could be severe. The third place a rope is needed is at a right facing, 12-foot high, off-width crack. This will be a difficult section for most people and is rated at 5.7 YDS. There is a ledge on top to belay from. Use a rope in the same three locations on the way back down. Beyond the right facing corner climb, the route yields to easier 3rd and some easy 4th class scrambling. Summit - The blaring speakers from the commercial horse rides fade, overtaken by the sounds of nature as the never-ending stairway takes hikers through a seemingly impossible route to the mountaintop after hours of breathtaking and diverse hiking. Once past the short "v-slot," head northerly through the dense vegetation as the beaten path heads toward a precariously perched rock outcropping where panoramas of the rims of this desert canyon unfold. This scramble around the western side of the mountain reveals the first views of Isaac and Abraham, two of the three mountains known as the Patriarchs. Continue, taking the short stroll through the sandy clearing to see Zion literally open up in front of you. Head for the man-made circular disc that sits atop a rocky perch in the far southeast corner of the mountaintop. This "compass" labels the cornucopia of peaks making up the most delightful display of rock in the park. On a clear day the unobstructed 360 degree view allows you to see as far away as the Arizona Strip. To the north is the popular canyoneering route. Behunin Canyon, as well as, Angels Landing and just beyond that Observation Point. To the east locate Red Arch Mountain and the Great White Throne. To the south look for both the East and West Temples, Deer Trap Mountain, Mountain of the Sun and the Three Patriarchs. Note: From the top of Lady Mountain the rock formations are from the Mesozoic era. From the top of Lady Mountain all but a small percentage of the visible rock is Navajo sandstone. GPS Coordinates WGS84 Datum
First Cliffband and Start of Scrambling 5.3 Chimney Problem 5.7 Corner Crack Problem GPS coordinates are only references and may or may not be accurate. Do not rely on GPS coordinates as the sole method of navigation. Always have an accurate, detailed map at hand and have the proper map reading and navigation skills before setting out on any hike. Many of the hikes listed in this guide travel into canyons where a GPS has limited capabilities. Always check your position with a detailed map before dropping into a canyon. Beta: Coordinates and other trail and canyoneering information by Zion Park search and rescue veteran team member Bo Beck and zionnational-park.com author Mary Cisneros. To post trip reports, offer corrections, updates, or for more information please visit the Zion National Park Forum Suggested Gear: A sturdy pair of shoes are recommend to hike the trails in Zion National Park. Many quality shoes will help grip the rocks and prevent injury.
Zion National Park, UtahHistory of the Thunderbird |
East Zion Lodge Mileage from Stay in a hotel the heart of the parks, Mount Carmel Junction, and visit the treasures of the Southwest and Utah. Site Map Zion Hiking |
||||||||||||
|
This is my new favorite quote:
"I don't know who Mary Cisneros is, but I mean zionnational-park.com It's a better site than the NPS's anyway." Written by the authors of the book: Favorite Hikes in and around Zion National Park |
|||||||||||||
|
Zion History |
|---|
All rights reserved © Copyright Zion National-Park dot com
Do not use text, photos or maps without permission © Zion National-Park dot com
Contact the Author Mary Cisneros with any errors

 Trailhead



 Beginning off of the Middle Emerald Pool Trail